
BEGIN 主题可以给文章分类页面、独立页面以及文章详情页面添加标题图片,但是在搜索结果页面及 404 页面却无法通过配置添加标题图片,本文简单分享一下给搜索结果页面和 404 页面添加标题图片,以及批量给文章页面添加标题图片的实现方法。

给搜索页面添加标题图片
给搜索结果页面、标签页面及 404 页面添加标题图片,可以通过修改源码的形式实现。
1、实现方法
编辑 header-slider.php,位置:wp-content/themes/begin/template/header-slider.php,在最末端最后一行下面添加:
<?php if ( is_search() || is_tag() || is_404() ) { ?>
<div class="header-sub">
<div class="cat-des wow fadeInUp">
<div class="cat-des-img">
<img src="https://oss.pieruo.com/2020/07/07/iHRs.jpg" />
</div>
<div class="header-title-main bgt">
<h1 class="header-title bgt wow fadeInUp">
<?php
if(is_search()) {
echo '搜索结果';
}elseif (is_tag()) {
echo single_tag_title('', false);
}elseif (is_404()) {
echo '亲,你迷路了';
}else {
echo '';
}
?>
</h1>
</div>
<div class="clear"></div>
</div>
</div>
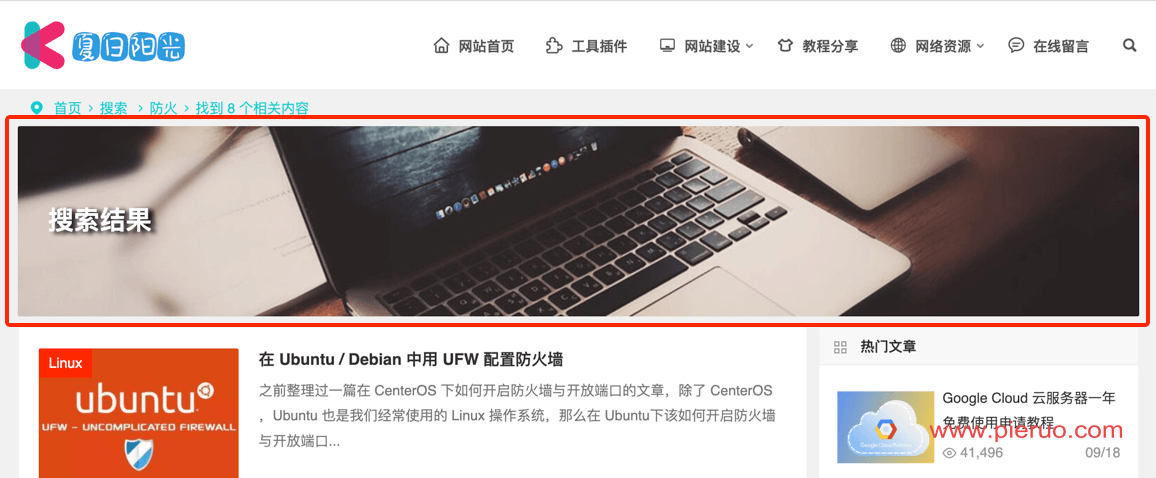
<?php }?>2、效果预览
预览效果如下:
给文章添加标题图片
文章标题图片可以在文章编辑页面添加,那么,如何批量给文章添加标题图片的方式呢?
思路:给文章批量添加标题图片,需要先确认哪些文章已添加标题图片,如果有的话可以先删除,然后通过 SQL 语句批量添加。
1、查询
查询已添加标题图片的文章:
select * from wp_postmeta m where m.meta_key = 'header_bg'
and m.post_id in (
    SELECT t.id from wp_posts t where t.post_type = 'post' and t.post_status = 'publish'
)
# limit 100
建议添加 limit 语句, 防止查询的数据量过大。
2、删除
删除已经存在的文章标题图片:
delete from wp_postmeta m where m.meta_key = 'header_bg'
and m.post_id in (
    SELECT t.id from wp_posts t where t.post_type = 'post' and t.post_status = 'publish'
)
3、批量添加
确认文章都没有标题图片后,给文章批量添加标题图片:
INSERT INTO wp_postmeta
(post_id, meta_key, meta_value)
SELECT
t.id, 'header_bg', 'https://oss.pieruo.com/2020/07/07/iHRs.jpg'
from wp_posts t where t.post_type = 'post' and t.post_status = 'publish'
4、效果预览
效果如下:

5、文章标题及面包屑不显示解决方法
给文章添加标题图片后,会发现正文部分不显示文章标题和面包屑,因为文章标题和面包屑默认是在标题图片位置显示的。
a、显示文章标题
编辑 content.php,位置:wp-content/themes/begin/template/content.php,查找:
<?php if ( get_post_meta($post->ID, 'header_img', true) || get_post_meta($post->ID, 'header_bg', true) ) { ?>
<?php } else { ?>
    <?php if ( get_post_meta($post->ID, 'mark', true) ) { ?>
        <?php the_title( '<h1 class="entry-title">', '<span class="t-mark">' . $mark = get_post_meta($post->ID, 'mark', true) . '</span></h1>' ); ?>
    <?php } else { ?>
        <?php the_title( '<h1 class="entry-title">', '</h1>' ); ?>
    <?php } ?>
<?php } ?>
修改为:
<?php if ( get_post_meta($post->ID, 'mark', true) ) { ?>
    <?php the_title( '<h1 class="entry-title">', '<span class="t-mark">' . $mark = get_post_meta($post->ID, 'mark', true) . '</span></h1>' ); ?>
<?php } else { ?>
    <?php the_title( '<h1 class="entry-title">', '</h1>' ); ?>
<?php } ?>
b、显示面包屑
同样,查找:
<?php if ( ! get_post_meta($post->ID, 'header_img', true) && !get_post_meta($post->ID, 'header_bg', true)  ) : ?>
    <?php if (zm_get_option('meta_b')) {
        begin_single_meta();
    } else {
        begin_entry_meta();
    } ?>
<?php endif; ?>
修改为:
<?php if ( ! get_post_meta($post->ID, 'header_img', true) && !get_post_meta($post->ID, 'header_bg', true)  ) { ?>
    <?php if (zm_get_option('meta_b')) {
        begin_single_meta();
    } else {
        begin_entry_meta();
    } ?>
<?php } else { ?>
    <?php if (zm_get_option('meta_b')) {
        begin_single_meta();
    } else {
        begin_entry_meta();
    } ?>
<?php }?>
3、效果预览
效果如下:

结束语
本文简单分享了一下给搜索结果页面和 404 页面添加标题图片,以及批量给文章页面添加标题图片的实现方法,供有此需求的朋友参考。如果有任何意见或建议,欢迎在下方评论处留言。
本文已通过「原本」原创作品认证,转载请注明文章出处及链接。
